• Skip to primary navigation
  • Skip to main content
  • Skip to primary sidebar
  • Home
  • FAQS
  • Privacy Policy

Rants From My Crazy Kitchen logo

  • About
  • Recipe Index
  • Contact Me/Work With Me!
menu icon
go to homepage
search icon
Homepage link
  • Home
  • FAQS
  • Privacy Policy
  • Follow Me!

    • Facebook
    • Pinterest
    • Twitter
  • ×
    Home » Recipes

    Recipes

    Bacon Gazpacho

    August 12, 2014

    Bacon-Month-2014-Square-500-300x300


    Welcome to week two of #BaconMonth hosted by Julie of White Lights on Wednesday. All month we are giving away cookbooks that focus on our favorite food thanks to Julie! This week a copy of Bacon 24/7 is up for grabs, and I have to say, it looks good 🙂


    Bacon-24-7


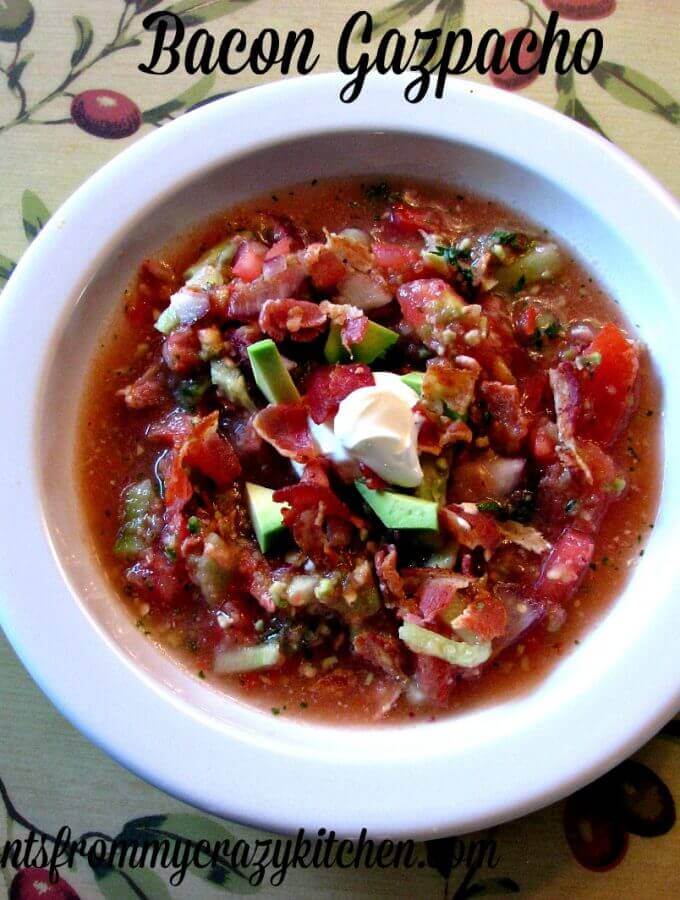
    More about the giveaway in a few minutes, but first I want to introduce you to what happens when my garden and bacon get together. I have tons of tomatoes and cucumbers every year, so much so that I already gave a bunch away. Before I did, I decided bacon would be fabulous in gazpacho. I make gazpacho only once every year or so, because I'm the only one here who really likes it, but I know I'm not the only one in the world who likes it, and I think adding bacon to it was a "brilliant idea"! Say that in the tone of Blair from The Facts of Life. Okay, that really shows my age, anyway.....


    Bacon-Gazpacho-Close-Up


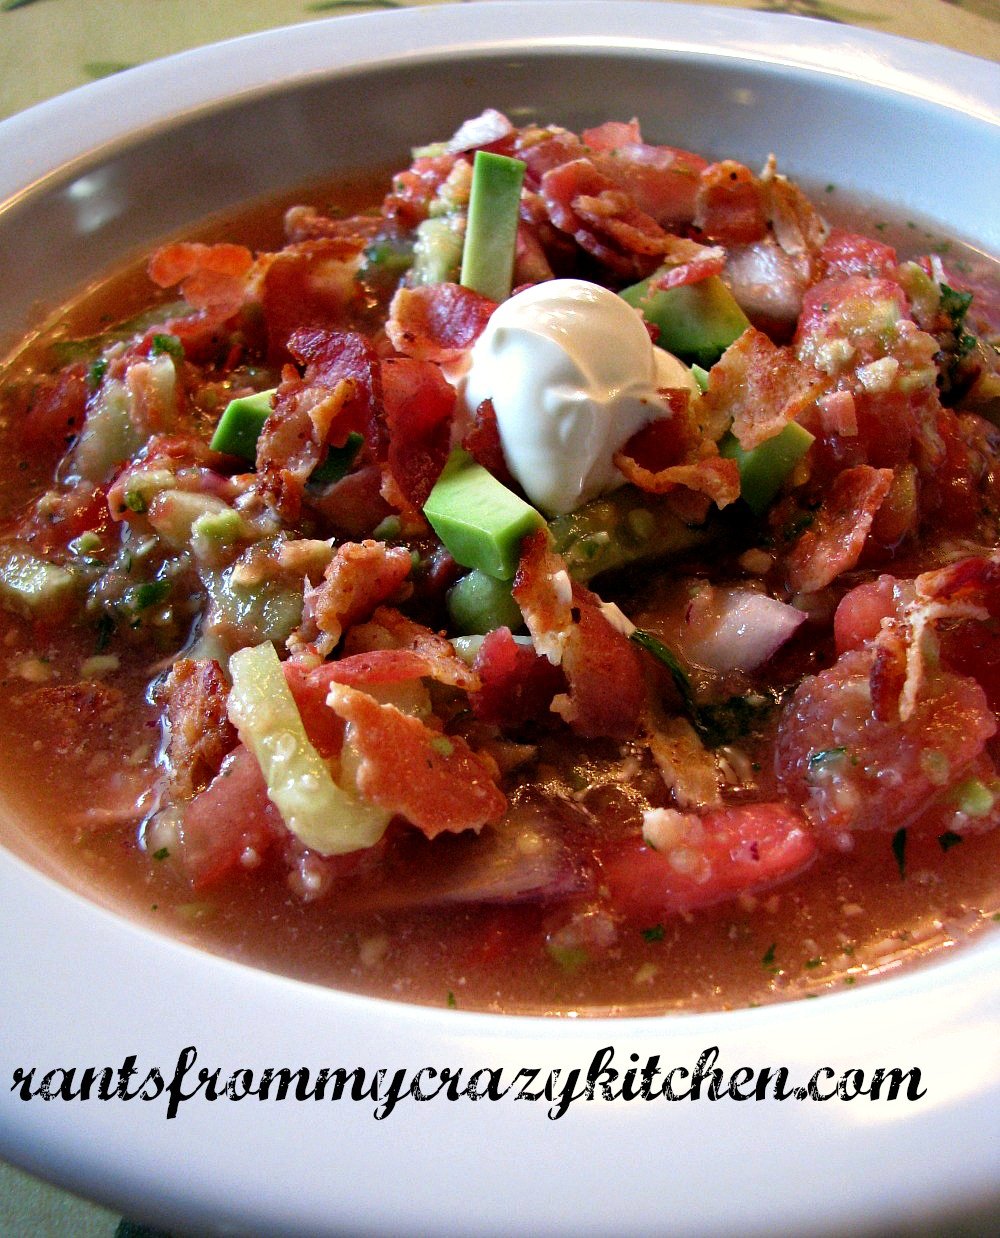
    I used a whole, unseeded jalapeno in mine, because I like it hot, but to be honest I made it too hot. It wasn't anything a little sour cream stirred into it couldn't fix, and it added a creamy touch to the gazpacho that I loved! If you want to save yourself from that, however, you can easily remove most or all of the seeds from the jalapeno before adding it to the mix, or leave it out if you really don't want it spicy. Use a just ripe, not mushy avocado for best results. They don't brown as easily and won't turn to mush in the soup.


    Bacon-Gazpacho


    This weeks giveaway is open to US and Canadian residents. Canadian residents will receive an amazon.com egiftcard in the amount of the book's price. Winners will be announced within 48 hours, and will have 48 hours to claim prize, must be 18+, and entries will be verifies (no "giveaway accounts").

    a Rafflecopter giveaway


    Print Recipe
    No ratings yet

    Bacon Gazpacho

    Summer Gazpacho elevated in flavor with the addition of bacon. Perfect for hot summer days!
    Prep Time30 minutes mins
    Cook Time1 hour hr
    Total Time1 hour hr 30 minutes mins
    Course: Soup
    Cuisine: Mexican American
    Servings: 6
    Calories: 360kcal
    Author: Bernadette

    Ingredients

    • 2 ¼ pounds tomatoes ,chopped
    • 12 ounces applewood smoked bacon
    • 2 limes ,juiced
    • 2 garlic cloves ,minced
    • 1 large cucumber ,peeled and diced
    • 1 avocado ,cut in half ,divided, and chopped
    • ½ of a large red onion chopped
    • 1 jalapeno (seeded or unseeded depending on desired heat)
    • ½ cup lightly packed fresh cilantro
    • 2 cups water
    • 1 tablespoon bacon grease

    Instructions

    • Cook bacon until crispy, drain, reserving 1 tablespoon grease, set aside. Chop all vegetables and divide in half. Cut avocado in half and rub one half with a piece of lime, dice the other half. Crumble bacon.
    • Add half of the chopped vegetables, half the crumbled bacon, half of the chopped avocado, lime juice, and cilantro to a food processor and process until vegetables are fine. Pour processed vegetable mixture into a mixing bowl, then add remaining vegetables, most of the bacon (reserve some for topping), and avocado. Stir in water and bacon grease, refrigerate for at least one hour. Ladle into bowl, top with bacon and diced avocado from remaining half , if desired. Serve well chilled.

    Nutrition

    Calories: 360kcal | Carbohydrates: 15g | Protein: 9g | Fat: 30g | Saturated Fat: 9g | Cholesterol: 39mg | Sodium: 396mg | Potassium: 788mg | Fiber: 5g | Sugar: 6g | Vitamin A: 1650IU | Vitamin C: 38.9mg | Calcium: 45mg | Iron: 1.1mg

    An InLinkz Link-up


    Bacon Mozzarella and Tomato Zucchini Boats

    August 8, 2014

    Use up the abundance of summer zucchini with these outstanding Bacon Mozzarella and Tomato Zucchini Boats that are ready to eat in 30 minutes.

    Use up the abundance of summer zucchini with these outstanding Bacon Mozzarella and Tomato Zucchini Boats that are ready to eat in 30 minutes.

    Use up the abundance of summer zucchini with these outstanding Bacon Mozzarella and Tomato Stuffed Zucchini Boats that are ready to eat in 30 minutes.


    This post, photographs, and recipe was updated from the original on July 14, 2017.

    Bacon-Month-2014-Square-500-300x300


    Did you get to see my last post? I'm participating in Bacon Month hosted by Julie of White Lights on Wednesday all August long, with at least six recipes highlighting bacon, my favorite food group! Oh, wait, it's not a food group, is it? Well, it should be!

    I made these zucchini boats before I knew I was going to be taking part in Bacon Month, with zucchini from my CSA and tomatoes fresh from my garden. If only you could grow bacon, that would be awesome!

    Start by slicing your zucchini in half length-wise, then scoop out the middle with a melon baller or spoon to remove the seeds, being careful not to go all the way through.  See the two on top of the cutting board? I broke it. Funny thing is, it happened the exact same way when I went to update the photos three years later. Basically, while my photography skills have improved, my zucchini scooping skills have not.


    Scooped-Out-Zucchini


    Top with a mixture of cheeses, herbs, and bacon, place diced tomatoes on top (changed from the original strips of tomato)on top and bake at 375 F for about 20 minutes, or until the cheese is melted and the zucchini is tender.

    Original, horrible photos:

    Bacon-Mozzarella-and-Tomato-Stuffed-Zucchini-Boats


    Baked-Zucchini-Boats


    Here is a much better close up photo of these quick and easy zucchini boats.

    Bacon Mozzarella and Tomato Zucchini Boats

    Use up the abundance of summer zucchini with these outstanding Bacon Mozzarella and Tomato Stuffed Zucchini Boats that are ready to eat in 30 minutes.


    In the updated recipe I used larger zucchini than the last time, and needed to increase the amount of the other ingredients in my Bacon Mozzarella and Tomato Zucchini Boats. I have updated the recipe to include the amounts for small and medium zucchini. Larger zucchini will take a few more minutes to cook.

    WANT EVEN MORE DELICIOUS RECIPES FROM MYSELF AND MY FAVORITE FOOD BLOGGERS? FOLLOW ME ON PINTEREST, INSTAGRAM, OR FACEBOOK, WHERE I SHARE NEW RECIPES DAILY. YOU CAN ALSO SUBSCRIBE BY EMAIL TO GET NEWLY POSTED RECIPES FOR FREE!

    Use up the abundance of summer zucchini with these outstanding Bacon Mozzarella and Tomato Zucchini Boats that are ready to eat in 30 minutes.
    Print Recipe
    No ratings yet

    Bacon Mozzarella and Tomato Zucchini Boats

    Use up the abundance of summer zucchini with these outstanding Bacon Mozzarella and Tomato Zucchini Boats that are ready to eat in 30 minutes.
    Prep Time10 minutes mins
    Cook Time20 minutes mins
    Total Time30 minutes mins
    Course: Entree
    Cuisine: Italian American
    Servings: 6
    Calories: 95kcal
    Author: Bernadette

    Ingredients

    • 3 small to medium zucchini (about 4-6 inches long)
    • 4-8 pieces bacon ,cooked and crumbled
    • ½-1 cup shredded mozzarella
    • ¼ cup grated Parmesan
    • 1 tablespoon chopped chives
    • 1 tablespoon chopped parsley
    • 1 tomato diced or cut into strips

    Instructions

    • Preheat oven to 375 F. Cook, drain and crumble bacon. Cut zucchini in half length-wise, then carefully scooped out the middle.
    • In a small bowl combine both of the cheeses, chives, parsley, and bacon; stir to evenly distribute ingredients. Sprinkle bacon/cheese mixture into the scooped out middle of each zucchini; top with tomato strips.
    • Bake in the preheated oven for 15-20 minutes or until the cheeses are melted and the zucchini is tender.

    Nutrition

    Calories: 95kcal | Carbohydrates: 4g | Protein: 7g | Fat: 5g | Saturated Fat: 2g | Monounsaturated Fat: 1g | Cholesterol: 17mg | Sodium: 222mg | Potassium: 341mg | Fiber: 1g | Sugar: 3g | Vitamin A: 545IU | Vitamin C: 21.5mg | Calcium: 111mg | Iron: 0.5mg

    This weeks giveaway is a copy of Bacon Nation, and you can enter by scrolling down to this weeks giveaway here. You only have until August 10th to enter, so hop on over, but then come back for the recipe for these delicious zucchini boats! Giveaways are open to US and Canadian residents. Canadian residents will receive an amazon.com egiftcard in the amount of the book’s price. Winners will be announced within 48 hours, and will have 48 hours to claim prize, must be 18+, and entries will be verifies (no “giveaway accounts”). After the recipe, check out all the other recipes being shared this month! Follow all the Bacon Month fun with the hashtags #baconmonth and #putsomepiginit.

    All of the Bacon Month recipe are right here!

    An InLinkz Link-up


    Halushki with Bacon and Ricotta Cheese

    August 6, 2014

    Bacon-Month-2014-Square-500-300x300


    Today is my first post for Bacon Month, yay!! All month long myself and a group of awesome foodies will be sharing fantastic recipes with bacon, and giving away a new bacon focused cookbook each week, thanks to Julie from White Lights on Wednesday. This week, through Sunday, August 10, you have a chance to win a copy of Bacon Nation.


    Halushki-with-Bacon-and-Ricotta-Cheese


    Before we get to the giveaway, let me introduce you to the best halushki I have ever had. I mentioned at the beginning of the guest post my husband did for me, Polish Coal Miner Piggies, that I don't like cabbage. The only way I have ever been able to really enjoy it is in halushki, a Polish or Hungarian dish of shredded cabbage and egg noodles. Adding bacon and ricotta cheese to it takes it to a whole other level! The saltiness of the bacon combined with the creaminess of the cheese makes the cabbage (and noodles) just melt in your mouth. This recipe came about simply due to receiving two small heads of cabbage in my CSA share.  My husband was the one who mentioned adding ricotta to it, I had never heard of it, but I guess his grandmother used to do it, and I just happened to have ricotta on hand. Bacon, well, I always have that on hand!


    Bacon Nation


    This week, through Sunday, August 10, you have a chance to win a copy of Bacon Nation. I haven't seen it yet, but it sounds yummy! I know you want to enter right now, but you'll also want to check out my recipe for the best halushki ever below!!

    Giveaways are open to US and Candian residents. Candian residents will receive an amazon.com egiftcard in the amount of the book's price. Winners will be announced within 48 hours, and will have 48 hours to claim prize, must be 18+, and entries will be verifies (no "giveaway accounts"). Click here to enter, and scroll down to the applicable week to fill out your entry.


    Print Recipe
    4.17 from 6 votes

    Halushki with Bacon and Ricotta Cheese

    Egg noodles, shredded cabbage, bacon, and ricotta cheese combine in this delectable entree.
    Prep Time10 minutes mins
    Cook Time20 minutes mins
    Total Time30 minutes mins
    Course: Entee
    Servings: 6
    Calories: 430kcal
    Author: Bernadette

    Ingredients

    • 5 cups shredded cabbage
    • 12 ounces home style egg noodles
    • 8 slices bacon
    • 1 cup ricotta cheese
    • 1 cup chopped red onion
    • 1 garlic scape ,sliced fine ( or two garlic cloves, minced)
    • salt and pepper to taste

    Instructions

    • Cook the egg noodles according to package directions, adding salt and a few drops of olive oil to the water. Drain and set aside, reserving about ½ cup of the pasta cooking water.
    • Core and wash a small head of green cabbage. Slice in half (you may need more depending on how big your cabbage is), then slice into thin strips, discarding the thickest white part in the middle.
    • Cut the bacon into 1 inch pieces. In a large pan, cook the bacon over medium-high heat until just crispy (don't let it get too crispy!) Without draining, add the cabbage,onion,and garlic scapes. If using minced garlic wait to add it until the cabbage and onion are almost tender. Saute for 7-10 minutes,
    • Add the pasta to the cabbage mixture, along with the ricotta cheese. Stir well, then add the reserved water from the pasta, a little at a time, until desired consistency. Serve immediately.

    Notes

    Adapted from A Spicy Perspective Haluski Cabbage and Noodles

    Nutrition

    Calories: 430kcal | Carbohydrates: 46g | Protein: 17g | Fat: 19g | Saturated Fat: 7g | Cholesterol: 87mg | Sodium: 251mg | Potassium: 338mg | Fiber: 3g | Sugar: 3g | Vitamin A: 285IU | Vitamin C: 22.2mg | Calcium: 132mg | Iron: 1.7mg


    Check out all the great recipes my follow foodies are making for Bacon Month, and follow the #BaconMonth and #putsomepiginit hashtags on Twitter and Facebook.

    An InLinkz Link-up


    Kool-Aid Ice Cream -Guest Post from Cooking From A SAHM

    August 5, 2014

    Summer as a kid was always filled with ice cream treats, and my favorite thing in the world was the ice cream truck. As a grown-up I don't eat it even half as much as I used to, my daughter gets it at her grandmother's, and the ice cream truck I grew up with is long gone. So, I am so happy that my foodie friend brought an ice cream treat you can make that your kids are sure to enjoy!

    Kool-Aid-Ice-Cream
    Hello Everyone,
    This is Alyssa from Cooking From A SAHM. I'm here guest posting for Bernadette as she is spending summer with her kiddo and husband. I'm a mom to two kiddos and I'm also a blogger. I hope you enjoy this nice, easy recipe that even kids will love.  Start early as this takes 6 hours!!!

     Kool-aid Ice Cream

     2 Cups Heavy Whipping Cream

    1 can of Condensed Sweetened Milk

    1 Packet of orange kool-aid

    1 T Vanilla

    In a mixer bowl pour in your heavy whipping cream. Turn it on high and mix for 4-5 minutes till it makes a stiff peak. In another bowl mix your milk, kool-aid and vanilla. Whisk. Once your heavy cream is ready then you need to fold in the milk orange mixture. Once its folded in and mixed up pour it into a freezable container. I bought mine from the dollar tree.

    Bacon Month on RFMCK!

    August 1, 2014

    I'm so excited to be taking part in Bacon Month this year! I missed it last year, didn't know anything about it until a few foodie friends started posting some of the most amazing recipes with bacon I had ever seen! I almost missed it again this year, just found out about it two days ago, but I got in, and now I get to raise your cholesterol level for the next month, yay! Don't worry, I'll try to add something healthy to a few of the recipes 🙂

    Bacon Month 2014 Square 800


    There are over 15 blogs participating, and we'll be having a new giveaway each week starting this coming Monday, August 4th!!  You have a chance to win a new prize each week.  You can enter to win each individual prize at the bottom of this post, or on the posts for the prize available that week. Each giveaway will open at the beginning of the week the prize is up for grabs, and close at the end of that week. I will be posting two new recipes will bacon each week, so I hope you'll come back to check them out and enter.

    You'll have to wait until Monday for the great recipes to begin, but for now check out the participants, and I've included some of my favorite bacon recipes at the bottom. Just click on the photo to take you to the recipe! P.S. Yes, I'm missing from the photo of participants, told you I was late getting in. It's okay, I don't mind one bit 🙂

    Bacon Month 2014 Collage

    White Lights on Wednesday {host}

    Love Bakes Good Cakes

    Organized Island

    Call Me PMc

    It's Yummi

    Cravings of a Lunatic

    Kiss My Smoke

    Roxana's Home Baking

    Frugal Foodie Mama

    girlichef

    Kelli's Kitchen

    Food Lust People Love

    Keep it Simple, Sweetie

    Clarks Condensed

    Mom's Test Kitchen

    Around My Family Table 

    Thanks so much to everyone making this the best Bacon Month to date!

    Be sure to follow Bacon Month with the #baconmonth and #putsomepiginit hashtags, and get even more bacon recipes on our pinterest board!

    Follow Julie Espy's board I Heart | Bacon! on Pinterest.

    Here are some of my favorite recipes with bacon!

    Bacon Cheddar Deviled Eggs

    Bacon Cheddar Deviled Eggs


    baconwrappedcauliflower1
    Bacon Wrapped Cauliflower with Dark Chocolate


    Bacon Jalapeno and Monterey Jack Tamale Bites
    Bacon Jalapeno and Monterey Jack Tamale Bites


    Enter the weekly giveaways here!

    {giveaways will open for the week they are live and close at the end of that week.

    scroll down to find the open giveaway.}

    a Rafflecopter giveaway
    a Rafflecopter giveaway
    a Rafflecopter giveaway

    a Rafflecopter giveaway

    Swirled Cherry Almond Pops -Guest Post from My Imperfect Kitchen

    July 29, 2014

    I can't believe we are at the end of July already! My summer so far has been filled with gardening, swimming with my daughter, having her best friend here and watching them play (and fight) together, and a small issue with our pool which eventually caused us to have to drain and refill it. Being outside most of the summer, these Swirled Cherry Almond Pops from today's guest, Sara from My Imperfect Kitchen, make a perfect treat!

    You might remember Sara since we have guest posted for each other before, and her Philly Cheese Steak Stuffed Bell Peppers was one of the most popular guest posts of last summer. I think you will enjoy these pops just as much! Here's Sara!

    Hello everyone!  My name is Sara and I blog over at "My Imperfect Kitchen." My motto is "Life isn't perfect, but it should always be delicious!"  I want to thank Bernadette for allowing me the opportunity to share with you this week. It's been pretty hot where I live lately and when it's sweltering outside, there is nothing I like better than reaching inside the freezer for a cold treat. Of course, I like standing in front of the open freezer door too, but I think that has something to do with my age, more than the heat  😉  Anyway….now that you know more about me than you wanted,  here are my Swirled Cherry Almond Pops!
    Swirled-Cherry-Almond-Pops
    These pops are simple, delicious, and healthy. You probably have everything you need in your house right now! A great thing about these popsicles (aside from opening the freezer to get them!) is that they are incredibly versatile. You can use almost any type of fruit and switch the almond extract for vanilla extract, or leave it out! The honey gives you a little bit of sweet to balance the tart of the plain yogurt. Since the ingredients are simple, you can feel great giving these to your kids!
    Swirled-Cherry-Almond-Pops-1


    I've made these pops with blueberries and almond extract, strawberries with vanilla extract, peaches with vanilla extract and mango with coconut extract!  They're all delicious!  You'll have to let me know which ones are your favorite!

    Swirled Cherry Almond Pops

    2 cups fresh cherries, pitted. (alternately, you could use a 16 oz bag of frozen cherries that have been defrosted)

    1 cup plain yogurt

    2 TBLS honey

    ¼ tsp almond extract

    1. Place pitted cherries in a food processor or blender. Process until smooth, about 1 minute.

    2. In a small bowl, combine the yogurt, honey and almond extract. Stir with a spoon until fully incorporated.

    3. Pour a portion of the cherry puree into the bottom of the popsicle molds. Then, pour some of the yogurt honey mix on top. Repeat the process until the molds are full and you have nice layers of cherries and the yogurt mix. Lightly swirl the cherry puree and the yogurt together with a plastic chopstick or the handle of a plastic spoon, or just leave them in layers. I like to swirl mine because they look prettier in the pictures. HA!

    4. Place the popsicle sticks inside the molds. Transfer to the freezer for at least 4 - 6 hours.

    NOTE: To remove from the popsicles from their molds, pour warm water briefly over the outside of the molds and gently pull on the popsicle stick so it will release.


    Swirled-Cherry-Almond-Pops-2


    Still hungry?  Follow my adventures:
    On my blog: www.myimperfectkitchen.com
    On Facebook: www.facebook.com/MyImperfectKitchen
    On Twitter and Instagram: @MyImpKitch

    Printable recipe:

    Print Recipe
    No ratings yet

    Swirled Cherry Almond Pops

    Delicious ice pops perfect for hot summer days!
    Prep Time15 minutes mins
    Cook Time6 hours hrs
    Total Time6 hours hrs 15 minutes mins
    Course: Dessert/Snack
    Servings: 3
    Calories: 138kcal
    Author: Sara

    Ingredients

    • 2 cups fresh cherries ,pitted. (alternately, you could use a 16 oz bag of frozen cherries that have been defrosted)
    • 1 cup plain yogurt
    • 2 TBLS honey
    • ¼ tsp almond extract

    Instructions

    • Place pitted cherries in a food processor or blender. Process until smooth, about 1 minute.
    • In a small bowl, combine the yogurt, honey and almond extract. Stir with a spoon until fully incorporated.
    • Pour a portion of the cherry puree into the bottom of the popsicle molds. Then, pour some of the yogurt honey mix on top. Repeat the process until the molds are full and you have nice layers of cherries and the yogurt mix. Lightly swirl the cherry puree and the yogurt together with a plastic chopstick or the handle of a plastic spoon, or just leave them in layers.
    • Place the popsicle sticks inside the molds. Transfer to the freezer for at least 4 - 6 hours.
    • NOTE: To remove from the popsicles from their molds, pour warm water briefly over the outside of the molds and gently pull on the popsicle stick so it will release.

    Nutrition

    Calories: 138kcal | Carbohydrates: 26g | Protein: 3g | Fat: 2g | Saturated Fat: 1g | Cholesterol: 10mg | Sodium: 37mg | Potassium: 330mg | Fiber: 1g | Sugar: 23g | Vitamin A: 140IU | Vitamin C: 6.8mg | Calcium: 111mg | Iron: 0.3mg


    Garlic Basil Lamb Chops

    July 28, 2014

    I never tried lamb growing up. I don't think my mother or grandmother ever made it, but even if they had, I'm sure I wouldn't have eaten it as a child. I was THE WORLD'S PICKIEST EATER! It wasn't until much later, in my early twenties while working in the food service of a private boarding school that I finally tried it. The chef probably made it for the school Presidents Dinner or a function like that, and although I remember trying it then, I wouldn't have it again for years. Then recently while I was grocery shopping I saw a few packages of lamb chops, and thought, why not?


    Garlic-Basil-Lamb-Chops


    The inspiration for this recipe came from my 50+ Quick Summer Dinners collection and the view from great island's Lemon Thyme Lamb Chops. These lamb chops are quick, and really easy! I used basil because I grow it in my garden every summer, but thyme does work, too. I decided to roast slices of  lemon right along with the lamb, and served it over a bed of fresh spinach. The spinach you see on the plate was pretty much the extent of the spinach that grew this Spring. I'm going to try again in the Fall and see if it does better then. Last year when I planted spinach in the Spring nothing but weeds grew. Turns out, I am incredibly good at growing weeds.

    Print Recipe
    No ratings yet

    Garlic Basil Lamb Chops

    Quick and easy lamb chops pan grilled with garlic and basil alongside lemon slices.
    Prep Time25 minutes mins
    Cook Time8 minutes mins
    Total Time33 minutes mins
    Course: Entree
    Servings: 4
    Calories: 415kcal
    Author: Bernadette

    Ingredients

    • 4 lamb shoulder chops
    • 1 lemon ,sliced
    • 1 cup chicken broth
    • ¼ cup olive oil
    • 1 tablespoon chopped fresh basil
    • 1 teaspoon minced garlic
    • ⅛ teaspoon fresh ground black pepper

    Instructions

    • In a large, shallow dish combine the chicken broth, olive oil, basil, garlic, and black pepper. Place the lamb chops and lemon slices in the dish, turn to coat. Cover and let stand for 15-20 minutes turning occasionally.
    • Preheat a stove top cast iron grill pan over high heat. Remove the lamb chops and lemon slices from the marinade and place in the preheated pan. Reduce heat to medium-high and cook for 4 minutes without moving. Turn and cook for 4 minutes more, or until desired temperature. Serve immediately.

    Notes

    Adapted from the view from great island Lemon Thyme Lamb Chops

    Nutrition

    Calories: 415kcal | Carbohydrates: 3g | Protein: 42g | Fat: 25g | Saturated Fat: 6g | Cholesterol: 128mg | Sodium: 315mg | Potassium: 619mg | Vitamin A: 25IU | Vitamin C: 18.6mg | Calcium: 30mg | Iron: 4.1mg


    Sauteed Southern Collard Greens

    July 23, 2014

    I mentioned last week that I was selected for a fabulous opportunity to be a beta tester for IBM's Chef Watson, and that I had also joined a CSA. In the CSA box last week was collard greens. Neither myself or my husband had ever had them before.  I live in Northeast Pennsylvania, have never been farther South than Maryland and Virginia, and don't really know anyone Southern, so I decided to use Chef Watson to see what I could come up with.


    Southern-Collard-Greens


    I didn't follow a recipe that I found on there exactly, more like used it for inspiration. I admittedly haven't had a lot of time to play around with the app, but I can say that it is definitely still a beta that could use a few improvements. Here is how it works: Basically Chef Watson is a computer program that uses flavor compound algorithms to create recipes.   First it asks what ingredient you would like to use, so I entered "Collard Greens". It also gives you the opportunity to enter ingredients that you do not want to use. Then it asks for the kind of dish you would like to make, and gives you several options such as sauteed, casserole, barbecue, etc. Of all the choices available sauteed was the only one I felt fit collard greens. There are a few options that I felt could be listed but were missing, such as baked. Next, it asks what style of recipe you want to try, and suggests you enter a few styles, so from the list I picked "Southern", "Way Down South", and "Cajun/Creole".  Based on what you enter in these steps, you are then given a list of 100 recipe suggestions ranging from "Classic" to "Unique", however these recipes suggestions vary only slightly. Chef Watson is teamed with Bon Appetit, so the recipe suggestions are based off of recipes from bonappetit.com, although they are different than the original. I was suggested "Way Down South Southern Collard Greens Sauteed".

    I'm keeping in mind that this is still in beta, and I'm even in a group on Facebook where we discuss the various issues we are seeing with the app so we can help them to improve it. While most of the ingredients listed are unique yet what you would expect, the instructions on many recipes are "off". I know someone in the group received the instruction to "melt the chicken". I love melted chicken, personally 😉 My recipe suggestion told me to "season with carrot". It's fixable, just needs some more work. The goal of Chef Watson is to give the user unique ingredient combinations and let the cook themselves use them the way they like.  I can't wait to see the improvements they are already working on, and I'm sure you'll be seeing some more recipe ideas from them soon.

    As for the collard greens that I made, they are slightly spicy and garlicky without being overpowering. Since I had never had any kind of collard greens before, I wasn't sure what they tasted like. They are a little bitter, and remind me of kale more than spinach. My husband and I both liked them, and now I'm looking for different ways to make them, so if you have any suggestions, let me know!

    Print Recipe
    No ratings yet

    Sauteed Southern Collard Greens

    Southern-style collard greens with chili pepper and garlic heat!
    Prep Time10 minutes mins
    Cook Time20 minutes mins
    Total Time30 minutes mins
    Course: Side Dish
    Cuisine: Southern
    Servings: 4
    Calories: 125kcal
    Author: Bernadette

    Ingredients

    • 5 cups chopped collard greens (I just ripped them into pieces with my hands, middle tough stem removed)
    • 1 whole garlic scape ,sliced thin (or 2 cloves garlic, minced)
    • 1 small chili pepper ,minced
    • ¼ cup butter
    • dash onion powder
    • salt and fresh ground pepper ,to taste

    Instructions

    • Melt the butter in a pan over medium-high heat. Add the garlic scapes and chili pepper, saute for about 3 minutes, stirring often.
    • Add the chopped collard greens by the handful, stirring, until the collard greens are wilted and tender, about 10-15 minutes. Serve hot.

    Nutrition

    Calories: 125kcal | Carbohydrates: 4g | Protein: 1g | Fat: 11g | Saturated Fat: 7g | Cholesterol: 30mg | Sodium: 110mg | Potassium: 132mg | Fiber: 2g | Vitamin A: 2720IU | Vitamin C: 33.1mg | Calcium: 114mg | Iron: 0.4mg


    Flavoring with Lemon Instead of Salt: Lemon Herb Roasted Potatoes

    July 20, 2014

    Today's post is being sponsored by Sunkist, but I truly do love their S'alternative campaign! I've never been a fan of adding salt while cooking, anyway. Yes, I know I often include it in ingredients lists in my recipes, probably too much. I will watch that from now on.


    Roasted-Lemon-Herb-Potatoes


    We all know that salt isn't good for us, but for some it's hard to avoid. It's in most snack foods (processed foods contain the majority of the salt Americans consume every day), on restaurant french fries (for that matter, it's in almost everything served in a restaurant), in juices and sauces, let's face it, it's everywhere. The Dietary Guidelines for Healthy Americans recommends 1.500-2,300 milligrams of sodium per day, but most people consume much more than that, on average 3,400 milligrams a day! If you are anything like me, you like flavor in your food, right? So how do you keep that flavor while reducing salt? Use lemons!

    Sunkist-Inforgraph


    Sunkist S'alternative is a great way to reduce the sodium in your diet without giving up the flavor. Because nobody wants to do that. Ever.


    Sunkist-Lemons


    You can visit the Sunkist S'alternative landing page for more recipes and information on sodium and sodium alternatives.

    I knew I wanted to make roasted lemon potatoes, and I knew I wanted fresh herbs in it, so after a brief discussion with my husbands cousin over which herbs to use, I just went to my favorite source, Pinterest, to find a general recipe that could give me an idea on the roasting time. One particular recipe stuck out, this one from Rock Recipes. I did adapt it quite a bit, and they look nothing the same, but it did inspire me!


    Small-Red-Potatoes


    Chop up your scrubbed, clean potatoes into pieces about an inch big.


    Cut-Red-Potatoes


    Mix up your herbs, lemon zest, unpeeled garlic cloves, lemon juice, and olive oil in a big bowl.

    Herbs-Garlic-Lemon-Zest


    No, I'm not sure why the garlic peel is purple. It's from my garden and I just pulled it from the ground last week. Anyone know?

    Then combine the lemon/herb mixture with the chopped potatoes.
    Uncooked-Red-Potatoes-with-Lemon-Herb


    Pour into a preheated baking dish and bake a 400 degrees F for about 1 hour, stirring every 10 minutes to ensure it doesn't stick.

    Here's the printable recipe:


    Print Recipe
    4.13 from 8 votes

    Flavoring with Lemon Instead of Salt: Lemon Herb Roasted Potatoes

    Roasted red potatoes in a lemon herb marinade, flavorful, crispy potatoes without a hint of salt! #TableTheSalt
    Prep Time20 minutes mins
    Cook Time1 hour hr
    Total Time1 hour hr 20 minutes mins
    Course: Side Dish
    Servings: 6
    Calories: 283kcal
    Author: Bernadette

    Ingredients

    • 3 pounds small red potatoes ,cut into small pieces (about 1 inch big)
    • 2 Sunkist lemons ,juiced (about ¼ cup lemon juice)
    • zest of 1 lemon
    • 1 whole head garlic ,broken up and unpeeled
    • ¼ cup olive oil
    • ¼ cup chopped basil
    • 2 tablespoons chopped thin chives
    • 2 tablespoons chopped fresh parsley
    • ⅛ teaspoon fresh ground black pepper

    Instructions

    • Place a pan large enough to hold the chopped potatoes in the oven (empty) and preheat oven to 400 degrees F. The preheated pan helps keep the potatoes from sticking immediately to the pan.
    • Combine chopped basil, chives, parsley, lemon juice, garlic cloves, and lemon zest in a bowl and mix well. Pour the mixture over the potatoes, season with pepper, and mix well.
    • Bake in the preheated oven for about 1 hour, stirring every 10 minutes so the potatoes don't stick to the pan.
    • To serve you can remove the garlic cloves, or chose to serve them along with the potatoes.

    Notes

    Adapted from Rock Recipes Lemon Herb Roasted Potato Nuggets

    Nutrition

    Calories: 283kcal | Carbohydrates: 47g | Protein: 6g | Fat: 9g | Saturated Fat: 1g | Sodium: 46mg | Potassium: 1179mg | Fiber: 5g | Sugar: 4g | Vitamin A: 225IU | Vitamin C: 50.9mg | Calcium: 77mg | Iron: 2.4mg

    Overnight Oatmeal: Reusing Peanut Butter Jars -Guest Post from This Is How We Nerd

    July 15, 2014

    Overnight-Peanut-Butter-Oatmeal


    I haven't been blogging much this summer, but that doesn't mean I don't have some cool things going on behind the scene. I joined a CSA (community supported agriculture) run by Fertile Grounds last week, so I'm cooking with local, fresh produce! I was also accepted to be a beta tester for Chef Watson! Remember the computer Watson from Jeopardy!  a few years ago? That Watson! More on both in the coming weeks, because today I have a great overnight oatmeal recipe for you thanks to Samantha from This Is How We Nerd. I only know Samantha from a blogging group we both belong to, and she accepted my request for summer guest posters. Just one look at her site, and I found something fabulous, Shrimp and Bacon Stuffed Jalapeno Poppers!! Adding those to my "recipes to try" list right now! And today's recipe sounds quick and easy, so without further ado, here's Samantha:


    Hi there “Rants From My Crazy Kitchen” readers!! My name is Samantha and I am over at “This Is How We Nerd” (previously Custom Taste). Where I not only blog about recipes and food, but also technology, frugality, gaming and everything in-between. I hope you'll come visit me sometime. Today I am lending my kitchen to Bernadette for a fun, easy and frugal recipe! Hope you all enjoy!

    Overnight Oatmeal: Reusing Peanut Butter Jars

    We buy a lot of peanut butter in our home, like A LOT, and it can get pretty annoying when you get the majority of it last but have the pesky sides just slathered in peanut butter. Instead of spending time scraping the remains out, make Overnight Oatmeal! You can find tons of recipes out on the interwebs (pinterest being covered in them), the one I have today is very simple and can be easily altered before leaving it overnight for the next morning. Also, these can stay in your fridge for up to 5 days. So make them on one night and have them for the rest of the week!

    So, first things first, round up your ingredients.


    ingredientsshot


    You will need;

    Slightly empty peanut butter jars (of course)

    Oats (rolled, steel cut, or both)

    Milk (I use almond milk because I do not like the taste of animal milks)

    Vanilla Extract

    Oldish Banana

    Raisins (optional)

    Anything else you may desire.

    Depending on how many jars you are wanting to make you may need more or less of the ingredients. For one standard sized peanut butter jar I used about ¾ cup of milk, ¼ of a banana, ½ cup oats, 1 tsp vanilla and sprinkle of raisins.

    Start by mashing up your banana and mixing with the vanilla extract and milk.


    liquidmixture


    Pour about half of this mixture into the bottom of the jar.

    Sprinkle in half your raisins and then add all of the oats.

    Pour remaining liquid mixture on top, screw on cap and place into fridge.

    That is it!  Told you it was super easy peasy. No shaking or stirring required.

    When grabbing your jar for breakfast, do give a little bit of a mix just so you aren't eating everything separately. I also like to add cinnamon as well for extra oopmh.

    Overnight-Oatmeal

    Thanks so much for reading, I hope you all will enjoy my recipe and thanks to Bernadette for letting me guest post!

    Bye everyone!


    • « Go to Previous Page
    • Page 1
    • Interim pages omitted …
    • Page 28
    • Page 29
    • Page 30
    • Page 31
    • Page 32
    • Interim pages omitted …
    • Page 44
    • Go to Next Page »

    Secondary Sidebar

    Archives

    Browse by category

    • Appetizers (38)
    • Beef (24)
    • Breads (4)
    • Breakfast/Brunch (29)
    • Broths/Stocks (1)
    • Candy (1)
    • Casseroles (5)
    • Cauliflower (3)
    • Cheese (14)
    • Chicken (49)
    • Chocolate (13)
    • Christmas (14)
    • Cocktails/Beverages (7)
    • Cookies (7)
    • Crock Pot (8)
    • Cupcakes (2)
    • Desserts (41)
    • Dinner (20)
    • Dips (11)
    • Fruit (4)
    • Grilled (7)
    • Ham (6)
    • Healthy Recipes (3)
    • Instant Pot/Pressure Cooker (2)
    • Main Courses/Entrées (79)
    • Meats (8)
    • Pasta (29)
    • Pickles (1)
    • Pizza (8)
    • PKU Friendly (5)
    • Pork (13)
    • Potatoes (11)
    • Salads (14)
    • Sandwiches (4)
    • Sauces (11)
    • Savory Pies (3)
    • Seafood/Shellfish (38)
    • Side Dishes (19)
    • Slow Cooker (12)
    • Smoothies (1)
    • Snacks (1)
    • Soups/Stews (43)
    • Thanksgiving (8)
    • Tomatoes (4)
    • Turkey (11)
    • Vegan (10)
    • Vegetables (21)

    Footer

    ↑ back to top

    • ABOUT
    • RECIPES
    • CONTACT ME/WORK WITH ME!
    • FAQS
    • PRIVACY POLICY

    • Facebook
    • Pinterest
    • Twitter

    Copyright © 2025 Rants From My Crazy Kitchen

    Enter your name and email address to subscribe by email
    Stay up to date on all the latest recipes, reviews, giveaways, and more for free!

    Your privacy is important! Please refer to Rants From My Crazy Kitchen's Privacy Policy for information how we use your information and protect your rights.

    Rate This Recipe

    Your vote:


    A rating is required
    A name is required
    An email is required