• Skip to primary navigation
  • Skip to main content
  • Skip to primary sidebar
  • Home
  • FAQS
  • Privacy Policy

Rants From My Crazy Kitchen logo

  • About
  • Recipe Index
  • Contact Me/Work With Me!
menu icon
go to homepage
search icon
Homepage link
  • Home
  • FAQS
  • Privacy Policy
  • Follow Me!

    • Facebook
    • Pinterest
    • Twitter
  • ×
    Home » Recipes

    Recipes

    Cajun Crab

    April 22, 2014

    A few years ago my husband and I went to a St. Patrick's Day parade and met up with some friend's. After the parade we all went to a local restaurant called Kelsey's where I ordered the most amazingly good Cajun clams. I tried to recreate the recipe once, but then I forgot about it. Two years and a food blog later, and my friend Kim from Cravings of a Lunatic asked a group of us to write seafood recipes as guest posts on her blog. Kim and her daughter are allergic to seafood. Good thing I'm not because I love it!

    Plated Cajun Crab

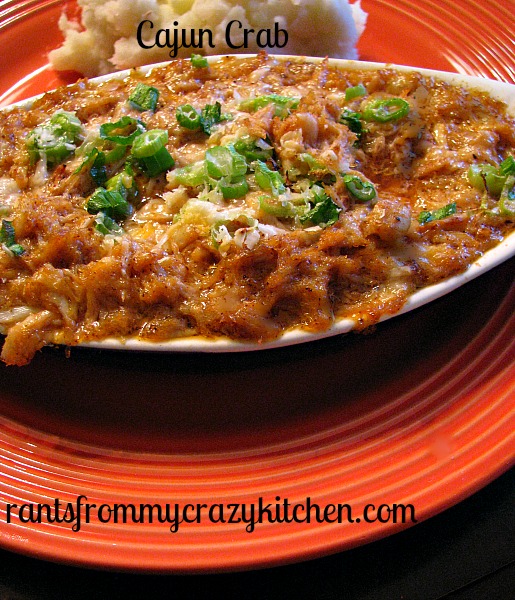
    As soon as Kim asked us to post I knew I was going to make that Cajun Crab. Yep, that's right, I forgot it was clams I had and not crab right up until I was almost ready to make it for her post! I decided it would be great anyway!

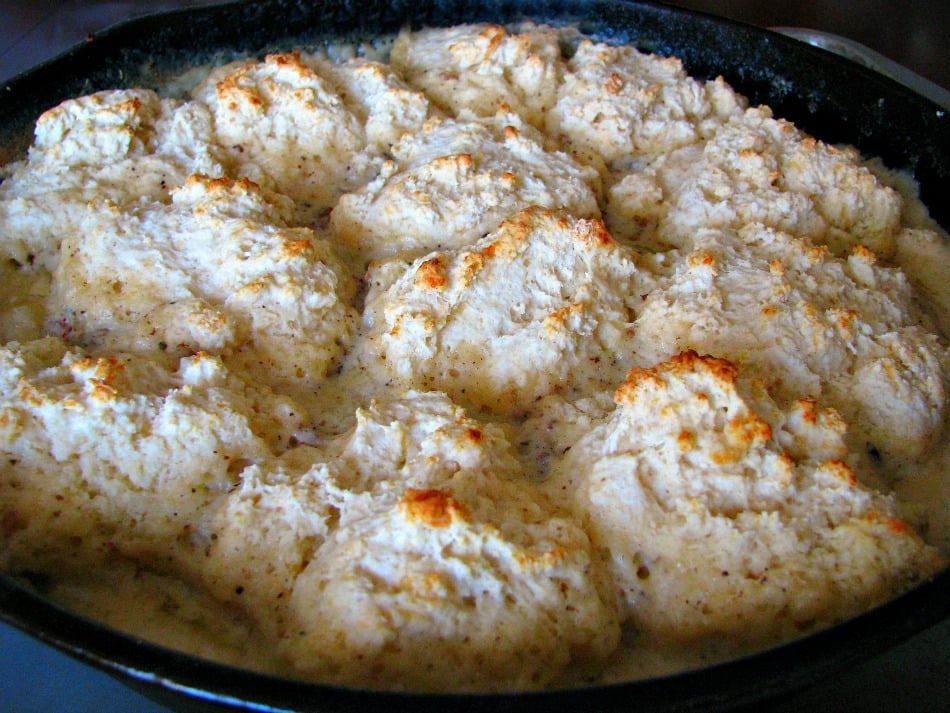
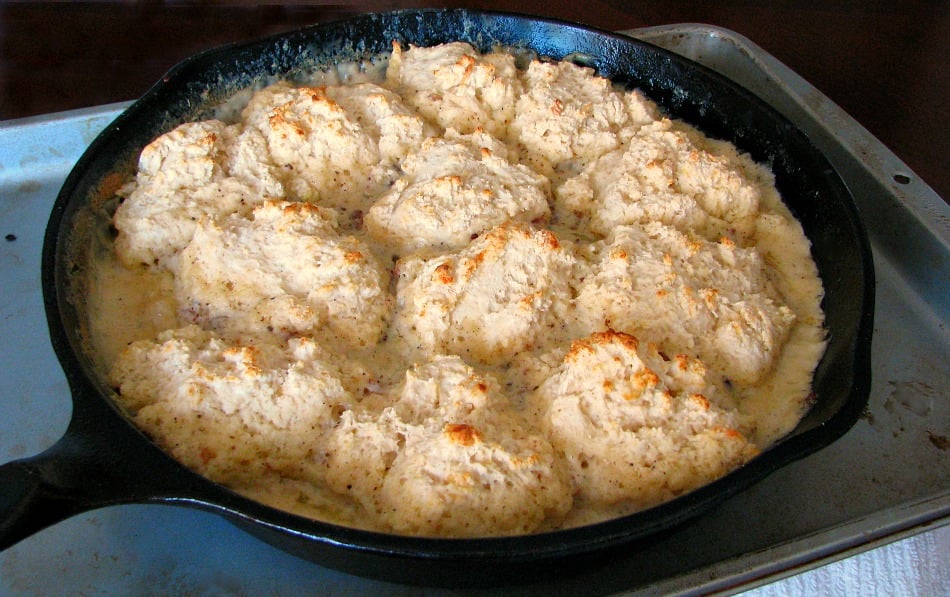
    This recipe is so incredibly simple and yet so delicious and flavorful that it makes a perfect dish for a special occasion. Butter mixed with Cajun spices, fresh crab meat,  a little thinly sliced scallion, and Parmesan cheese. That's it! Go on, head over to Cravings of a Lunatic for the full recipe for Cajun Crab! Don't forget to come back and tell me what you think.

    Ham and Cheese Crescent Roll Stromboli for #SundaySupper

    April 13, 2014

    Photo of sliced Ham and Cheese Crescent Roll Stromboli on a white cutting board next to a white bowl of marinara sauce

    Ham and Cheese Crescent Roll Stromboli made with crescent roll dough is an easy to make and delicious Stromboli that would be great served at a party, or anytime!

    Ham and Cheese Crescent Roll Stromboli 

    Photo of sliced Ham and Cheese Crescent Roll Stromboli on a white cutting board next to a white bowl of marinara sauce

    My husband has been after me to make a homemade Stromboli recipe for a long time, so when I joined the weekly #SundaySupper Movement recently and saw that the first theme I would be able to participate in was "Stuff, Roll, and Wrap", I knew immediately it was time to finally make one. I just couldn't bring myself to make homemade dough for it, I tend to make a mess with flour, and really didn't feel like cleaning it all up, so I decided to use  refrigerated crescent roll sheets as the dough instead.

    The purpose of #SundaySupper is bringing family back around the table. Right now we almost always have dinner together, but as our daughter gets older and starts participating in different activities, I know it will probably get harder to do. I do consider it important to have meals together, have a chance to talk, reconnect, and just spend time together, and that's why I decided to join this movement I had already heard so much about!

    I went with this recipe for stromboli, a simple Ham and Cheese Crescent Roll Stromboli, instead of a regular Italian Stromboli recipe, hoping my daughter would eat it. She did not. It appears we are at a VERY picky time period, she just didn't buy the idea it was like a grilled ham and cheese. Not that she would eat that, either, I was just grasping at straws.

    I started out by bringing the crescent roll dough to room temperature, which takes about an hour. Then I rolled the dough up into a ball and pressed it out with my fingers greased with just a few drops of olive oil, until it was about a 10 inch rectangle. Then I brushed a thin layer of marinara sauce over the dough, and then a layer of deli ham,

    Ham Layer

    and then a layer of sliced mozzarella cheese,

    Mozz Cheese Layer


    followed by just a little Parmesan cheese.

    Parm Layer

    Then I carefully folded over the dough a quarter of the way, then completely over the rest of the filling, and pressed the ends of the dough together.

    Unbaked Stromboli


    After it was folded, I brush the top with a little egg white, and then sprinkled Italian seasoning lightly over the top, then baked it at 350 degrees for 20 minutes.

    Whole Stromboli


    Let it cool for a few minutes before slicing, and served it with a side of marinara sauce for dipping. It immediately became one of my all time favorite stromboli recipes.

    Read below for the printable instructions for this Ham and Cheese Crescent Roll Stromboli, and then be sure to check out what everyone else made for today. Trust me, there are all kinds of delicious food here!

    Looking for more recipes using ham? Check these out:

    Ham Egg and Asparagus Breakfast Pizza 

    Slow Cooker Ham, Cheese, and Veggie Breakfast Casserole 

    Savory Ham, Cheese, and Sage Waffles 

    Ham and Pea Soup 

    WANT EVEN MORE DELICIOUS RECIPES FROM MYSELF AND MY FAVORITE FOOD BLOGGERS? FOLLOW ME ON PINTEREST, TWITTER, INSTAGRAM, OR FACEBOOK, WHERE I SHARE NEW RECIPES DAILY. YOU CAN ALSO SUBSCRIBE BY EMAIL TO GET NEWLY POSTED RECIPES FOR FREE!

    Easy Ham and Cheese Stromboli made with crescent roll dough.
    Print Recipe
    4.43 from 26 votes

    Ham and Cheese Crescent Roll Stromboli for #SundaySupper

    Ham and Cheese Crescent Roll Stromboli made with crescent roll dough is an easy to make and delicious Stromboli that would be great served at a party, or anytime!
    Prep Time1 hour hr 15 minutes mins
    Cook Time20 minutes mins
    Total Time1 hour hr 35 minutes mins
    Course: Entree
    Cuisine: Italian American
    Keyword: Ham and Cheese Stromboli, recipes with crescent dough sheets, stromboli recipe
    Servings: 4
    Calories: 593kcal
    Author: Bernadette

    Ingredients

    • 12 ounce refrigerated crescent dough
    • ¼ cup marinara sauce ,plus extra for dipping
    • 8 slices deli ham (cooked ham)
    • 6 slices mozzarella cheese
    • ¼ cup Parmesan cheese
    • a few drops olive oil
    • sprinkle of garlic powder
    • sprinkle of salt
    • 1 egg white
    • sprinkle Italian seasoning

    Instructions

    • Bring crescent dough to room temperature, 1 hour or longer (the warmer the dough is, the easier it is to work with).
    • Preheat oven to 350 degrees F.
    • On a large baking sheet press out the dough into about a 10-inch rectangle using your fingers lightly coated with olive oil. Brush the pressed out dough with a thin layer of marinara sauce, then layer on the ham and cheeses to about ½ inch from the edges. Sprinkle with garlic powder and salt.
    • Starting from a long end, fold the dough carefully a quarter of the way over then fold over the entire filling, pressing the dough ends together (you may have to stuff some of the filling back under). Brush lightly with egg white and sprinkle with Italian seasoning.
    • Bake in the preheated oven for 20 minutes, or until hot and golden brown. Let it rest a few minutes before slicing. Serve with marinara sauce for dipping.

    Nutrition

    Calories: 593kcal | Carbohydrates: 36g | Protein: 27g | Fat: 38g | Saturated Fat: 17g | Cholesterol: 72mg | Sodium: 1791mg | Potassium: 255mg | Sugar: 9g | Vitamin A: 400IU | Vitamin C: 1.1mg | Calcium: 293mg | Iron: 2mg


    Starters and Snacks

    • Easy Apple Dumplings by Hezzi-D's Books and Cooks
    • Endive Stuffed with Blue Cheese, Walnuts and Honey by Shockingly Delicious
    • Filipino Turon (Banana Lumpia) by Killer Bunnies, Inc
    • Arepas de Queso (cheese stuffed cornmeal cakes) by A Kitchen Hoor's Adventures
    • Chicken Tinga Taquitos with Avocado Cream by Savvy Eats
    • Eggy Rice Wraps by Jane's Adventures in Dinner
    • Puff Pastry and Prosciutto Wrapped Asparagus by The Girl In The Little Red Kitchen
    • Onigiri by Brunch With Joy
    • Stuffed Pierogie Shells by Seduction in The Kitchen
    • Scotch Eggs with Sriracha Dipping Sauce by Run DMT
    • Celery Root Lettuce Wraps with Beluga Lentils by The Wimpy Vegetarian

    Entrees and Mains

    • Rouladen by The Not So Cheesy Kitchen
    • Stracci di Antrodoco by Manu's Menu
    • Eggplant Rollatini by MealDiva
    • Chicken Cordon Blue by The Foodie Army Wife
    • Stuffed Whole Baby Savoy Cabbages by Food Lust People Love
    • Chicken Taco Egg Rolls by Table for Seven
    • Shrimp Tempura Rolls by Small Wallet, Big Appetite
    • Lemon and Herbed Stuffed Salmon by Nosh My Way
    • Tamales de Rajas y Requeson (Roasted Poblano Tamales) by La Cocina de Leslie
    • Bademjan Shekam-por - Persian Stuffed Eggplant by Culinary Adventures with Camilla
    • Mascarpone Blueberry Stuffed French Toast by gotta get baked
    • Korean-style Meaty Stuffed Potatoes by kimchi MOM
    • Strawberries and Cream Pancake Roll by Curious Cuisiniere
    • Creamy Goat Cheese Quinoa Stuffed Tomatoes by Take A Bite Out of Boca
    • Rolled Greek Meatloaf by Kudos Kitchen By Renee
    • Shrimp Burritos Con Queso by Cooking On The Ranch
    • Bee-Bim Bop Sushi Rolls by NinjaBaking.com
    • Angel Hair Shrimp Lettuce Wraps by Family Foodie
    • Genoa Salami and Kalamata Olive Calzones by The Texan New Yorker
    • Zucchini Boats by Confessions of a Culinary Diva
    • Girl's Camp Breakfast Burritos by Hot Momma's Kitchen Chaos
    • Crab Louie Stuffed Chicken by Cindy's Recipes and Writings
    • Rustic "Wrapped" Tart with Ramps by Delaware Girl Eats
    • Potato Roll Stuffed with Ham and Cheese in Red Sauce by Basic N Delicious
    • Ham, Turkey and Cheddar Turnovers by Magnolia Days
    • Crispy Chipotle Shrimp Burritos by Bobbi's Kozy Kitchen
    • Caprese Stuffed Chicken Breasts by Peanut Butter and Peppers
    • Pizza Pockets by girlichef
    • Ham and Cheese Crescent Roll Stromboli by Rants From My Crazy Kitchen
    • Beef Wellington Braciole by Cupcakes & Kale Chips
    • Greek Salad Wrap by The Messy Baker
    • Cabbage Venison Lettuce Wraps With Fresh Herbs by Sue's Nutrition Buzz

    All things Sweet

    • Carrot Cake Cinnamon Rolls by Chocolate Moosey
    • Chocolate Hazelnut Rugelach by Desserts Required
    • Chocolate Cake Roll by That Skinny Chick Can Bake
    • Cannoli Stuffed French Toast by Momma's Meals
    • Lemon Poppyseed Swirl Cookies by What Smells So Good
    • Peanut Butter Chocolate Chip Cookie Dough Egg Rolls by Melanie Makes
    • Raspberry and Lemon Curd Mascarpone Stuffed French Toast by La Bella Vita Cucina
    • Chocolate Chip Banana Sweet Rolls by Big Bear's Wife
    • Orange Chocolate Swiss Roll by Noshing With The Nolands
    • Salted Caramel Chocolate Cookies by Alida's Kitchen
    • Flourless Peanut Butter and Jelly Cookies by Pies and Plots

    Sunday Supper Movement

    Join the #SundaySupper conversation on twitter on Sunday! We tweet throughout the day and share recipes from all over the world. Our weekly chat starts at 7:00 pm ET. Follow the #SundaySupper hashtag and remember to include it in your tweets to join in the chat. Check out our #SundaySupper Pinterest board for more fabulous recipes and food photos.

    Would you like to join the Sunday Supper Movement? It’s easy! You can sign up by clicking here: Sunday Supper Movement.

    Crock Pot Pork Barbecue

    April 7, 2014

    I had the weirdest craving for a Pork BBQ sandwich. Those that know me know that is something I would never crave, and wouldn't even normally want to eat! But, I did and my husband was thrilled when I told him I planned on making it. We have a couple of good BBQ shack type restaurants around here, but they always seem to get overlooked when we eat out.

    I started out by chopping up some favorite veggies, carrots, green peppers, and red onions.

    chopped veggies
    Then I put a pork picnic shoulder in the crock pot with the veggies, and covered it ¾ of the way with water.


    Pork BBQ in the Crock Pot

    Then I put the Crock Pot on high, and let it cook for 5 hours. I probably could have gone longer, so that the pork would have shredded more easily, but we were perfectly okay with the pork being chopped instead of shredded. After 5 hours I removed the picnic shoulder from the crock pot and left the veggies in to simmer while I removed the excess fat and chopped up the pork. Then I removed the veggies to a large bowl using a slotted spoon, and drained the water from the Crock Pot, reserving one cup to add into my BBQ sauce mixture.

    My husband wanted a sweet barbecue sauce so I made one with brown sugar and molasses. I had never made a barbecue sauce before, sweet or spicy! I just didn't want to use bottled this time, and felt it was time to expand my cooking skills into barbecue sauce 🙂


    CrockPot Pork BBQ


    I'm pretty sure I'll be making my own sauce again! Next time I want to try a spicy one. Hmmm.....

    Print Recipe
    No ratings yet

    Crock Pot Pork Barbecue

    Pork slow simmered in the Crock Pot with favorite veggies, then finished with a sweet barbecue sauce!
    Prep Time30 minutes mins
    Cook Time6 hours hrs
    Total Time6 hours hrs 30 minutes mins
    Course: Entree
    Servings: 8
    Calories: 645kcal
    Author: Bernadette

    Ingredients

    • 5 pound pork picnic shoulder
    • 2 carrots ,shredded
    • 1 green bell pepper ,diced
    • 1 red onion ,diced
    • 8 Kaiser rolls ,for serving
    • For the barbecue sauce:
    • 2 cups 100% natural ketchup (no corn syrup or preservatives)
    • 1 ½ cups light brown sugar
    • 3 tablespoons tomato paste
    • 3 tablespoons apple cider vinegar
    • 2 tablespoons molasses
    • ¼ teaspoon garlic powder

    Instructions

    • Place the pork picnic shoulder in a large crock pot. Sprinkle the shredded carrots and diced green peppers and onions around and on top of the pork, and fill the crock pot with water until the pork shoulder is three-fourths covered. Turn the crock pot on (<THIS STEP IS ALWAYS VERY IMPORTANT!), set to high and cook for a minimum of 5 hours, or up to 7 hours. You may want to turn the pork once during cooking if it seems like the pork is "floating" in the water.
    • Meanwhile prepare the barbecue sauce: In a large bowl combine the ketchup, brown sugar, tomato paste, vinegar, molasses, and garlic powder; stir until well mixed.
    • Remove the pork from the crock pot (leave the veggies in) and remove the excess fat with a sharp knife. Chop or shred the pork. Remove the veggies from the crock pot using a large slotted spoon, then drain the all the water from the crock pot, reserving 1 cup. Stir the hot liquid into the barbecue sauce mixture, then put the chopped or shredded pork and vegetables back into the crock pot. Stir in the barbecue sauce, cover, and cook on high for 1 hour more. Serve on Kaiser rolls.

    Nutrition

    Calories: 645kcal | Carbohydrates: 86g | Protein: 40g | Fat: 14g | Saturated Fat: 4g | Cholesterol: 115mg | Sodium: 834mg | Potassium: 935mg | Fiber: 2g | Sugar: 55g | Vitamin A: 2905IU | Vitamin C: 16.6mg | Calcium: 135mg | Iron: 4.8mg


    Cooking Light Dinnertime Survival Guide Cookbook Review

    April 2, 2014

    Cooking Light Dinnertime Survival Guide Cookbook Review. Unlike any other cookbook I have ever read it's chapter titles are what really brought me in.

    Disclaimer: I was provided with a copy of Cooking Light Dinnertime Survival Guide in return for my review. All opinions, as always, are my own.  Read on after the Cooking Light Dinnertime Survival Guide Cookbook Review for the recipe for this yummy Black Bean Soup! 

    Cooking Light Dinnertime Survival Guide Cookbook Review. Unlike any other cookbook I have ever read it's chapter titles are what really brought me in.


    Delicious, easy and quick Black Bean Soup using canned beans and refrigerated salsa!

    Cooking Light Dinnertime Survival Guide by Sally Kuzemchak is unlike any other cookbook I have ever read. It's chapter titles are what really brought me in. Think about the name of my blog, Rants From My CRAZY Kitchen. CRAZY being the important word. I named it that because my life is always hectic, no matter what I try to do. That's what this cookbook is about! Just a sample of the chapter titles: "Frankly, I Just Don't Feel Like It" (yep, even food writers feel that way!), "My Kids Take All My Attention" (kid, dog stealing things and I have to chase her down, husband, cleaning....) and "I'm Not A Short Order Cook" (I'm getting better at that one.). This cookbook is for busy families, hectic schedules, mom's (and dad's!) that need a break! You need a break, but everyone still needs to eat, and you don't want to be going for fast food every night. Or you have a picky kid that won't eat a thing you make ( I know that one!). This cookbook offers advice on what to do in almost every situation, and it's good advice, like just let your kids have ketchup with EVERYTHING, and letting your children decide what is for dinner (within reason) once a week. There are tips from mom's across the country throughout the book.

    Sally Kuzemchak is a mom of two boys, registered dietitian, and blogger at Real Mom Nutrition. Teaming up with Cooking Light for this cookbook follows years of work freelance writing and specializing in nutrition.  The book will be in stores nationwide on April 22, but is available for pre-sale on Amazon right now.

    I have made 4 recipes from the cookbook so far,and can say I loved them! I asked on my Facebook page which of a few I should share and several people said the Black Bean Soup, which is great and actually my favorite of the one's we tried!

    I hope you enjoyed my Cooking Light Dinnertime Survival Guide cookbook review, and I really suggest you try this one! Now for the yummy Black Bean Soup.

    Black Bean Soup 2

    Print Recipe
    4.50 from 2 votes

    Black Bean Soup

    Delicious, easy and quick Black Bean Soup using canned beans and refrigerated salsa!
    Prep Time10 minutes mins
    Cook Time16 minutes mins
    Total Time26 minutes mins
    Course: Soup
    Cuisine: Mexican American
    Servings: 4
    Calories: 311kcal
    Author: Cooking Light Dinnertime Survival Guide by Sally Kuzemchak

    Ingredients

    • 1 teaspoon olive oil
    • ¼ cup chopped onion
    • 1 clove garlic ,minced
    • 2 cups organic vegetable broth
    • ½ teaspoon Spanish smoked paprika
    • ¼ teaspoon ground cumin
    • ¼ teaspoon dried oregano
    • 2 15-ounce cans unsalted black beans, rinsed and drained
    • ½ cup refrigerated fresh salsa
    • ⅜ teaspoon salt
    • 1 4.5 ounce can chopped green chiles, drained
    • 1 diced peeled avocado ,optional
    • 1 tomato chopped (optional)
    • Chopped fresh cilantro ,optional
    • sour cream optional

    Instructions

    • Heat a large saucepan over medium-high heat. Add oil to pan; swirl to coat. Add onion and garlic;saute 3 minutes or until tender. Add broth and next 4 ingredients (through beans); bring to a boil. Cover, reduce heat, and simmer 10 minutes.
    • Place half of bean mixture in a blender. Remove center piece of blender lid (to allow steam to escape); secure blender lid on blender. Place a clean towel over opening in blender lid (to avoid splatters). Blend until smooth. Add pureed soup to remaining soup in pan. Stir in salsa, salt,and green chiles; cook over medium heat 3 minutes or until throughly heated.
    • Ladle soup into each of 4 bowls; top with avocado, tomato, cilantro, and sour cream, if desired.

    Notes

    Nutritional information does not include the optional sour cream 
    Recipe from Cooking Light Dinnertime Survival Guide

    Nutrition

    Calories: 311kcal | Carbohydrates: 10g | Protein: 14g | Fat: 9g | Saturated Fat: 1g | Sodium: 1747mg | Potassium: 1083mg | Fiber: 19g | Sugar: 3g | Vitamin A: 860IU | Vitamin C: 17.8mg | Calcium: 104mg | Iron: 4.9mg

    I'll be sharing the other recipes I made at another time, and I give this cookbook 5 stars.  I even see a few more recipes I want to make 🙂


    Sausage Gravy and Biscuits

    March 27, 2014

    Sausage gravy is one of those things I love but never made at home. I would only have it on the rare occasion when we would go to a local diner, and that hasn't happened at all in a few years. So, I was browsing Pinterest one night and I saw a recipe for it from my friend Donna at The Slow Roasted Italian called Sausage Gravy and Biscuit Skillet and I knew I had to try making it at home!

    Sausage Gravy and Biscuits 2

    Problem, I couldn't find bulk breakfast sausage! I'm sure it exists, just not in the grocery store I usually go to. If this happens to you just break up breakfast sausage links into little pieces (the uncooked kind, not precooked!).

    I decided to use aged Gouda cheese in the biscuits, because I love it, but Parmesan or Asiago would be good, too. The gravy is so easy to make, and the whole dish is ready in about 30 minutes, in one pan! I love that since I have a never-ending pile of dishes to wash. I used my cast-iron skillet, but any oven-proof skillet would do.

    Sausage Gravy and Biscuits 1

    By the way, if any food writers are reading this, you should NEVER try writing a recipe when you haven't eaten and your starving! I'm seriously drooling looking at my pictures. Just some food for thought. Get it? Sorry, worst joke ever....just give the recipe, Bernadette!

    Print Recipe
    No ratings yet

    Sausage Gravy and Biscuits

    Creamy sausage gravy with cheesy biscuits in one pan!
    Prep Time10 minutes mins
    Cook Time20 minutes mins
    Total Time30 minutes mins
    Course: Breakfast
    Cuisine: Southern
    Servings: 6
    Calories: 583kcal
    Author: Bernadette

    Ingredients

    • 1 pound breakfast sausage (bulk or uncooked links broken into little pieces)
    • 1 teaspoon ground sage
    • 3 cups whole milk
    • 4 tablespoons unsalted butter
    • 4 tablespoons all-purpose flour
    • 2 teaspoons fresh ground black pepper
    • For the biscuits:
    • 2 cups all-purpose flour
    • 1 cup whole milk
    • ½ cup shredded aged Gouda cheese
    • 1 tablespoon baking powder
    • 1 tablespoon granulated sugar
    • 1 /2 teaspoon kosher salt

    Instructions

    • Preheat oven to 450 degrees F.
    • Heat a large (10 inch) well seasoned cast-iron skillet over medium-high heat, add the sausage and the ground sage, stir to combine and break up the sausage. Cook and stir until browned.
    • Add the butter to the pan and stir. Once the butter is melted, sprinkle 4 tablespoons flour over the sausage and stir until no white specks of flour remain. Add the milk and pepper, stir to combine, scraping the bottom of the pan to release the tiny sausage pieces,let come to a simmer, then reduce the heat to low while you make the biscuits.
    • In a mixing bowl combine the flour, cheese, baking powder, sugar, and salt. Mix well, then add the milk and stir with a fork until a solid dough forms.
    • Turn off the stove then drop the biscuit mixture by the spoonful onto the gravy. Place the pan on a large metal cookie sheet, then bake in the preheated oven for 10-12 minutes, or until the biscuits are cooked through and lightly browned.

    Notes

    Adapted from The Slow Roasted Italian

    Nutrition

    Calories: 583kcal | Carbohydrates: 48g | Protein: 25g | Fat: 31g | Saturated Fat: 13g | Cholesterol: 176mg | Sodium: 757mg | Potassium: 663mg | Fiber: 1g | Sugar: 10g | Vitamin A: 590IU | Vitamin C: 0.4mg | Calcium: 422mg | Iron: 3.3mg


    Blueberry Habanero Dipping Sauce

    March 21, 2014

    Blueberry Habanero Dipping Sauce

    I was supposed to take part in this month's Crazy Ingredient Challenge which was Blueberries and Tofu, but things went wrong. Like the tofu. The only thing that went right was the blueberry part. I thought a crispy baked tofu sounded good, but once it was done I realized I had completely under-seasoned the panko breadcrumbs I dipped the tofu in, and to be honest, it was quite awful. The blueberries I made into a dipping sauce with habanero pepper and we all thought it was really good, but it was too late to do anything about the tofu. Unfortunately for me, I tend to procrastinate, and so I was making this recipe at 6:30 PM when the post was due at 10 AM the next day! Then, my daughter's God-mother was over and using my computer to take an online test for a new job, and it took much longer for her to finish than I expected. I wouldn't have been able to start my post until 10 PM, even if the tofu was good. So, I gave up for the night realizing the dipping sauce would go great with other things.


    Blueberry Habanero Dipping Sauce


    I had the idea for this dipping sauce since I first heard the challenge, and it tastes exactly like I hoped it would! It's a fabulous mix of sweet and hot! I think it would be fabulous for dipping the Jalapeno Cheddar Bites I made a few months ago in, or with Mozzarella Sticks!

    Tell me, what do you plan on trying it with? Or, if you have tried it, what did you think it was good with? 

    Print Recipe
    4.86 from 7 votes

    Blueberry Habanero Dipping Sauce

    Fiery hot habanero and sweet blueberries are the base for this fabulous dipping sauce! Pair with Jalapeno Cheddar Bites, Poppers, or Mozzarella Sticks for a perfect appetizer.
    Prep Time10 minutes mins
    Cook Time15 minutes mins
    Total Time25 minutes mins
    Course: Dip
    Servings: 3
    Calories: 252kcal
    Author: Bernadette

    Ingredients

    • 1 pint blueberries
    • 1 small habanero pepper
    • ½ cup granulated sugar
    • 2 Tablespoon fruit pectin not instant!

    Instructions

    • In a medium bowl, crush the blueberries with the back of a large spoon. Pour into a medium saucepan.
    • Cut the habanero pepper in half and remove the seeds ( you might want to wear plastic gloves, or make sure to wash your hands WELL after handling!). Dice fine. It should equal about 1 tablespoon, if you have much more reserve it for another use.
    • Add the diced habanero to the saucepan along with the blueberries, add enough water to just cover the blueberries, then stir in the sugar and fruit pectin. Bring to a boil, reduce heat and cook for 15 minutes, stirring often.
    • Purée using an immersion blender, or carefully pour the hot liquid into a blender or food processor and purée. Allow to cool slightly, then pour into containers, cover, and refrigerate until chilled.

    Nutrition

    Calories: 252kcal | Carbohydrates: 65g | Protein: 1g | Sodium: 21mg | Potassium: 121mg | Fiber: 4g | Sugar: 49g | Vitamin A: 115IU | Vitamin C: 20.1mg | Calcium: 9mg | Iron: 0.7mg


    Garlicky White Cheddar and Dill Veggie Dip

    March 18, 2014

    “The Laughing Cow® provided me with product and a $10 gift card for this review. However, thoughts and opinions are my own and do not necessarily reflect those of the brand.”

    I'm almost two years into blogging and I realized recently that I haven't shared very many healthy, light recipes. I have a few, here and there, like my Asparagus Soup with Dill Oil Drizzle and Freezable Cooked Salsa, but they haven't been as frequent as they should be. So, today I'm happy to be sharing a light dip with you. The Laughing Cow® sent me three kinds of their light cheese wedges to try out and make into a great snack idea. I received Light White Cheddar, Light Swiss, and Light Queso Fresco and Chipotle. I decided the white cheddar would make a great veggie dip. With each cheese wedge having just 35 calories, I used the whole package for this dip and the entire bowl is just 288 calories!! Did you know garlic has 4 calories a clove?

    Garlicky White Cheddar and Dill Veggie Dip

    I thought it was great as a veggie dip, but my husband thought it would be great as a spread on a cucumber roll, and made me go buy more cheese to make them! I'll tell you how I put those together at the bottom of this post, because I preferred the dip 🙂 It's simple to put together with just three ingredients, then you just let it chill for a few hours so the flavors meld. Of course, you could dive right in, but I recommend waiting so the garlic is infused with the cheese and not quite as strong. It's still a little strong, but it goes great with fresh, crisp vegetables like cauliflower, broccoli, cucumbers, or whatever you prefer.


    Print Recipe
    No ratings yet

    Garlicky White Cheddar and Dill Veggie Dip

    White cheddar cheese, garlic, and dill combine to make a light dip great for snacking on with your favorite veggies or as a spread.
    Prep Time5 minutes mins
    Cook Time4 hours hrs
    Total Time4 hours hrs 5 minutes mins
    Course: Appetizer
    Servings: 3
    Calories: 96kcal
    Author: Bernadette

    Ingredients

    • 1 containers 8 wedges The Laughing Cow® Light White Cheddar
    • 2 cloves garlic finely minced
    • ¼ tsp dried dill crushed

    Instructions

    • Put the cheese wedges in a small mixing bowl. Add in the minced garlic, and dried dill, crushing the dill between your fingers. Mix with a wooden spoon, then cover and refrigerate for 4 hours.

    Notes

    Cook time refers to refrigeration time.

    Nutrition

    Calories: 96kcal | Protein: 5g | Fat: 4g | Saturated Fat: 2g | Cholesterol: 13mg | Sodium: 480mg | Sugar: 2g | Vitamin C: 0.7mg | Calcium: 217mg


    Cucumber Rolls


    Now, the cucumber rolls are also very easy to put together and would make a great last minute appetizer for unexpected guests or those times when your running late and don't have time to make anything else, if you already have the dip prepared. The ¾ cup dip will be enough spread for 3 rolls.  All you need is three flour tortillas, ¾ cup chopped cucumber, and 3 tablespoons sliced green onion ( green part only). Spread the prepared dip with a knife or spatula over one side of each tortilla, leaving off the edges by an inch, then sprinkle with ¼ cup of the cucumber and 1 tablespoon of the green onion. Carefully roll up and slice with a sharp knife into one inch pieces.

    Roasted Asparagus with Parmesan

    March 15, 2014

    Asparagus is my all-time favorite spring vegetable. It's one of the healthiest vegetables there is, with less than four calories per serving and  high in vitamins including folic acid and potassium*. It's also one of the few vegetables my four year old won't eat. Yep, you read that right, A (my daughter), loves most vegetables and always has! It's only getting her to eat everything else that is a challenge. I imagine when she gets older she will like asparagus though, and she did try this one, because she LOVES Parmesan cheese!

    This asparagus is roasted to perfection with a good quality extra-virgin olive oil. Yes, I know extra-virgin is supposed to be for dressings and marinades, and you are supposed to use regular olive oil for roasting, but just trust me here, the extra-virgin olive oil gives the asparagus amazing flavor even before the Parmesan cheese is added!

    Roasted Asparagus with Parmesan


    I drizzled a little lemon juice over the asparagus for an extra burst of flavor, along with salt and pepper. The Parmesan cheese is then sprinkled on at the end of roasting just long enough to melt, and is a wonderful addition. Make this as a side dish for your next holiday dinner to perfectly round out your meal! You'll have to double or triple the recipe, though, what I'm giving you hear is just two servings!


    Print Recipe
    No ratings yet

    Roasted Asparagus with Parmesan

    Asparagus drizzled with extra-virgin olive oil and lemon juice, roasted, and topped with Parmesan cheese for a perfect side dish.
    Prep Time5 minutes mins
    Cook Time20 minutes mins
    Total Time25 minutes mins
    Course: Side Dish
    Servings: 2
    Calories: 242kcal
    Author: Bernadette

    Ingredients

    • 1 small bunch asparagus (about 13 pieces)
    • ½ cup shredded fresh Parmesan cheese
    • 2 tablespoons extra-virgin olive oil
    • 1 teaspoon lemon juice
    • ½ teaspoon coarse sea salt
    • ¼ teaspoon fresh ground black pepper

    Instructions

    • Preheat oven to 400 degrees F. Rinse asparagus and pat dry.
    • Cut off the bottom tough end (about 1 inch). Lay the asparagus flat on a baking pan and drizzle with the olive oil and lemon juice. Sprinkle with the salt and pepper and turn to coat evenly.
    • Roast for 15-20 minutes, turning halfway through cooking, until tender. Turn once more, sprinkle evenly with Parmesan cheese, and return to the oven for 1 minute

    Notes

    Adapted from Food Network

    Nutrition

    Calories: 242kcal | Carbohydrates: 1g | Protein: 9g | Fat: 20g | Saturated Fat: 6g | Cholesterol: 17mg | Sodium: 982mg | Potassium: 231mg | Vitamin A: 845IU | Vitamin C: 6.4mg | Calcium: 296mg | Iron: 1.4mg

    Cajun Turkey Cutlets and eMeals Review

    March 12, 2014

    This is a sponsored post for eMeals. I was provided with a one year free plan in exchange for my review. I also receive a small commission through Commission Junction for anyone that signs up with eMeal after being referred by me.  All opinions are my own.

    I was recently approached by eMeals to see if I would like to try them out. eMeals is a meal planning service that offers all sorts of plans based on your diet and family size. The meal plan is sent to your email every Wednesday, and includes 5 meals a week for $58.00 a year. You can add options like breakfast, lunch, and dessert for an extra 3-4 dollars a month. The email sends you a downloadable PDF that includes the meal plan for the week and a grocery list, and you can access grocery store deals on their site available from stores nationwide! There is even a eMeals app available so you can access your meal plans and grocery lists on the go.

    One thing I love about it is I was able to easily change my meal plan. I was provided with a subscription to classic meals and tried out the Cajun Turkey Cutlets from the list (recipe below), but this week I decided I wanted to see what the meal plans would be like in a category I don't usually cook, so I changed it to paleo and I think I like it better! They also offer vegetarian, Mediterranean, clean eating, low-calorie, and many other plans.

    I'm going to give you the recipe I chose to make first, and then tell you a little bit about what I personally think about the plan.


    Cajun Turkey Cutlets


    This is a really easy recipe, great for busy weeknights! The best part is, it only has 4 ingredients!


    Print Recipe
    No ratings yet

    Cajun Turkey Cutlets

    Turkey breast cutlets quickly marinated in Cajun seasonings for a quick and easy meal solution!
    Prep Time10 minutes mins
    Cook Time6 minutes mins
    Total Time16 minutes mins
    Course: Entree
    Servings: 4
    Calories: 205kcal
    Author: Bernadette

    Ingredients

    • 2 tablespoons fresh lemon juice
    • 1 teaspoon Cajun seasoning
    • 1 ½ lb turkey cutlets
    • 1 tablespoon olive oil

    Instructions

    • Stir together lemon juice and Cajun seasoning in a large bowl. Add turkey cutlets, turning to coat; let stand at least 10 minutes ( I let mine stand about 20 and turned them a few times)
    • Heat oil in a large nonstick skillet ( I used my cast iron skillet) over medium-high heat. Add turkey; cook 3 minutes per side or until done.

    Notes

    Recipe from emeals

    Nutrition

    Calories: 205kcal | Protein: 36g | Fat: 6g | Cholesterol: 91mg | Sodium: 350mg | Potassium: 423mg | Vitamin A: 280IU | Vitamin C: 2.9mg | Calcium: 24mg | Iron: 1mg


    Ok, my thoughts on the recipe and eMeals. The turkey is good, my husband and I liked it, but I think the categories some of the recipes for the classic plan are a bit off. This recipe was labeled "kid-friendly" and included a side dish I didn't make of a black eyed pea and tomato couscous. I don't really think that is kid-friendly, and the turkey was a little too spicy for my 4 year old although I do think she ate a few tiny pieces. The other thing I didn't really like about the classic plan was many of the side dishes, for the first week I received, were pre-packaged salads and rolls. Yes, I do use them occasionally, but I wouldn't include them in a "meal plan".  That is the reason I changed to the paleo plan for this week, and the recipes are a lot different and more to my liking!

    I added on the breakfast plan, and I'm going to make one of the recipes tomorrow. Many of them look good, but I don't make breakfast during the week, and I don't think many people do.

    In closing, is it something I would normally use? No, but I'm a food blogger, so that makes sense 🙂 No, really, I can see it being a useful plan for busy people who don't know where to start with meal planning or don't like to cook.  You can easily change out the sides if you don't care for them, and I think it's good that they have selections like the gluten free meal plan, it would be so helpful for those new to the diet. Speaking of new to the diet, I wasn't even really sure what paleo is so that's why I chose it for this week!

    If eMeals sounds like something you would like to try out or you would just like to find out more about it, click on this image for more information.


    I think I'm going to change my plan every few weeks throughout the year to try different diets. You should see some recipes adapted from there over the next year, stay tuned!

    Chocolate Coffee Peanut Butter Cup Brownies

    March 7, 2014

    Secret Subject Swap


    Welcome to a Secret Subject Swap, hosted by Karen from Baking In A Tornado. This week, 14 brave bloggers picked a secret subject for someone else and were assigned a secret subject to interpret in their own style. Today we are all simultaneously divulging our topics and submitting our posts.

    My subject was assigned to me by Single Mum Plus One, and the subject is:  "You have been selected as the guest on This is Your Life! Pick three people from your life that would come and speak about you on the day, and three highlights of your life that would be discussed." Seriously?

    I was going to go all serious with this one, and interview my mother, best friend, and husband, but after talking to my best friend I realized they would all say the same thing for the highlight of my life, my daughter!

    Edited 8 months old

    Ignore the hair. Mine, not her's! 


    Edited Gerber Baby Wannabe

    Gerber Baby Wannabe! 


    and today, at four and a half!

    Edited Winter 2014


    I'm sure all three of them would say our wedding, too!

    Edited Wedding


    The third highlight would be my daughter's Godmother and her sister, who I was a live in babysitter for when they were little, and are still a big part of my life. The oldest is almost 21 now, and pregnant with her first child! Unfortunately, I couldn't find a picture of them together!

    So, going with the whole "This is Your Life" theme, I wanted to make a recipe that is "me" but the only thing I could think of was pasta ( I LOVE it!!) and I really wanted brownies. Ha! Not just any brownies, either, I knew I wanted chocolate, peanut butter and coffee together! So I went on a long, tedious search to find something I could adapt from the ingredients I had on hand, and behold I found Peanut Butter Cup Brownies from Sugerhero! right on my own "Recipes To Try" Pinterest board! I have that board full of recipes, most of which have been on there for a year or more and I have yet to try! Oh, well, now I know where to look when I need a recipe to try 😉

    Chocolate PB Coffee Cup Brownies

    The original recipe has a peanut butter frosting which sounds great but I was out of cream and out of time. I added peanut butter chips instead, sprinkled over the still hot brownies right out of the oven, so they melted slightly and are delicious.

    Print Recipe
    4.67 from 3 votes

    Chocolate Coffee Peanut Butter Cup Brownies

    Chewy chocolate coffee brownies with Reese's Peanut Butter Cups topped with peanut butter chips
    Prep Time15 minutes mins
    Cook Time40 minutes mins
    Total Time55 minutes mins
    Course: Dessert
    Servings: 9
    Calories: 1029kcal
    Author: Bernadette

    Ingredients

    • 8 ounces 2 sticks unsalted butter
    • 12 ounces semi-sweet chocolate chips
    • 6 large eggs
    • 2 cups granulated white sugar
    • 2 cups all-purpose flour
    • 1 cup coarsely chopped miniature Reese's Peanut Butter Cups
    • 1 cup milk chocolate chips
    • ½ cup unsweetened cocoa powder
    • ¼ cup Reese's Peanut Butter Chips
    • 4 tablespoons instant coffee
    • 2 teaspoons real vanilla extract
    • ½ teaspoon salt
    • nonstick cooking spray

    Instructions

    • Preheat oven to 350 degrees F. Line a 9x13 baking pan with aluminum foil and spray with nonstick cooking spray.
    • In a large pot melt the butter over very low heat, then add in the semi-sweet chocolate chips. Whisk continuously until the chocolate chips are completely melted and smooth, then remove the pot from the heat.
    • Whisk in the cocoa powder, sugar, coffee granules, vanilla extract, and salt, then whisk in the eggs, one at a time, until the mixture is smooth. Add in the flour, a little at a time, stirring until no white streaks remain. Fold in the chopped peanut butter cups and milk chocolate chips and mix well.
    • Pour the batter into the prepared baking pan (the mixture will be VERY thick at this point), spread evenly, and bake in the preheated oven for 35-40 minutes or until a toothpick inserted in the middle comes out mostly clean, with just some melted chocolate remaining on the toothpick. Top immediately with peanut butter chips, then place the pan on a wire rack until cool enough to refrigerate until slicing ( refrigerating makes slicing easier) .

    Notes

    Adapted from Sugerhero!

    Nutrition

    Calories: 1029kcal | Carbohydrates: 124g | Protein: 15g | Fat: 54g | Saturated Fat: 30g | Cholesterol: 170mg | Sodium: 318mg | Potassium: 549mg | Fiber: 7g | Sugar: 88g | Vitamin A: 870IU | Vitamin C: 0.2mg | Calcium: 107mg | Iron: 5.8mg


    • « Go to Previous Page
    • Page 1
    • Interim pages omitted …
    • Page 31
    • Page 32
    • Page 33
    • Page 34
    • Page 35
    • Interim pages omitted …
    • Page 44
    • Go to Next Page »

    Secondary Sidebar

    Archives

    Browse by category

    • Appetizers (38)
    • Beef (24)
    • Breads (4)
    • Breakfast/Brunch (29)
    • Broths/Stocks (1)
    • Candy (1)
    • Casseroles (5)
    • Cauliflower (3)
    • Cheese (14)
    • Chicken (49)
    • Chocolate (13)
    • Christmas (14)
    • Cocktails/Beverages (7)
    • Cookies (7)
    • Crock Pot (8)
    • Cupcakes (2)
    • Desserts (41)
    • Dinner (20)
    • Dips (11)
    • Fruit (4)
    • Grilled (7)
    • Ham (6)
    • Healthy Recipes (3)
    • Instant Pot/Pressure Cooker (2)
    • Main Courses/Entrées (79)
    • Meats (8)
    • Pasta (29)
    • Pickles (1)
    • Pizza (8)
    • PKU Friendly (5)
    • Pork (13)
    • Potatoes (11)
    • Salads (14)
    • Sandwiches (4)
    • Sauces (11)
    • Savory Pies (3)
    • Seafood/Shellfish (38)
    • Side Dishes (19)
    • Slow Cooker (12)
    • Smoothies (1)
    • Snacks (1)
    • Soups/Stews (43)
    • Thanksgiving (8)
    • Tomatoes (4)
    • Turkey (11)
    • Vegan (10)
    • Vegetables (21)

    Footer

    ↑ back to top

    • ABOUT
    • RECIPES
    • CONTACT ME/WORK WITH ME!
    • FAQS
    • PRIVACY POLICY

    • Facebook
    • Pinterest
    • Twitter

    Copyright © 2025 Rants From My Crazy Kitchen

    Enter your name and email address to subscribe by email
    Stay up to date on all the latest recipes, reviews, giveaways, and more for free!

    Your privacy is important! Please refer to Rants From My Crazy Kitchen's Privacy Policy for information how we use your information and protect your rights.

    Rate This Recipe

    Your vote:


    A rating is required
    A name is required
    An email is required